To begin carving a face in wood, select a piece of wood and make the required cuts. The expert will guide you through the process using a step-by, video tutorial. The progressing cut will make carving the face much more realistic. It is important to create a lifelike facial expression by adjusting the position of the noses in the wood. To give your face a more realistic look, you can also use shellac and colored dyes.
Hardwoods
First, consider the type of wood you intend to use when carving a wood face. Hardwoods are broad-leaved trees that can grow in all climates. Hardwoods are ideal for many purposes, such as furniture building and furniture making, due to their large range in density, strength, and appearance. Although hardwoods are less expensive than softwoods, they can also be strong and resistant to fire.
You might want to try wood carving if you are new to the art. These types of wood are more easy to work and are an excellent choice for beginners. Be aware that softer woods won't have the same finish and quality as hardwoods. Before you decide on a type of wood, try out different types.
Softwoods
When carving a face from wood, the first step is to choose the right softwood. Softwoods are more difficult to carve, and often will have many knots. You can also break them more easily if you use large strokes. An experienced carver may cut small pieces of wooden, which can reduce the detail. It is not a problem but something to be aware.
Some hardwoods are easier to work with than others. Aspen, butternut and basswood are some of the most easy to work with. You should use knives that have a greater bevel. Softwoods are also easier to work with than hardwoods, so you can carve them either along or across the grain. The quality of your finished product will depend on the wood you choose for carving.
Colored Dyes
Use colored dyes to create vibrant and detailed wood carvings. You can find these in a wide variety of colors and mix them with water or alcohol to create a unique colour. You can also use shellac and colored dyes to lighten the wood. After applying dyes, ventilate your work area and clean your brushes with denatured alcohol. Another option is paste wax. You should be aware that excessive glossiness can distract from your work. Use 0000 Steel Wool to remove any excessive glossiness.
Wood dyes come in many varieties and are easy to use. Wood dyes work well with all topcoats. They can solve common finishing problems. They are easy-to-mix and apply because they are available in a wide range of primary colors. They can also be purchased in different shades so that you can create your own unique colors. You can even mix them to create your own colors.
Shellac
Before applying shellac to your wood carving, you should have it ready and handy. Although you can buy a jar of the stuff, it is easier to use a brush to apply it. Two-pound cuts will suffice. It will slowly build up and reduce brush marks. Also, it's better to buy a thicker cut than a thinner one, because shellac is very water-thin. You can make your own pads from cotton lumps the size of golf balls and lint-free cloth. Next, dip your tip into the shellac. Let the excess water flow back into the bottle.
Shellac can be used for accenting grain or adding color. Shellac is available as a variety colors. This allows you to mix and match different shades of resin to create your own blends. The lac can be used to darken the color. Shellac is not like other wood finishes. It won't become yellowed or cloudy over time. Shellac is also more durable, which means you can make even more faces. You can do this with almost any type of woodcarving project.
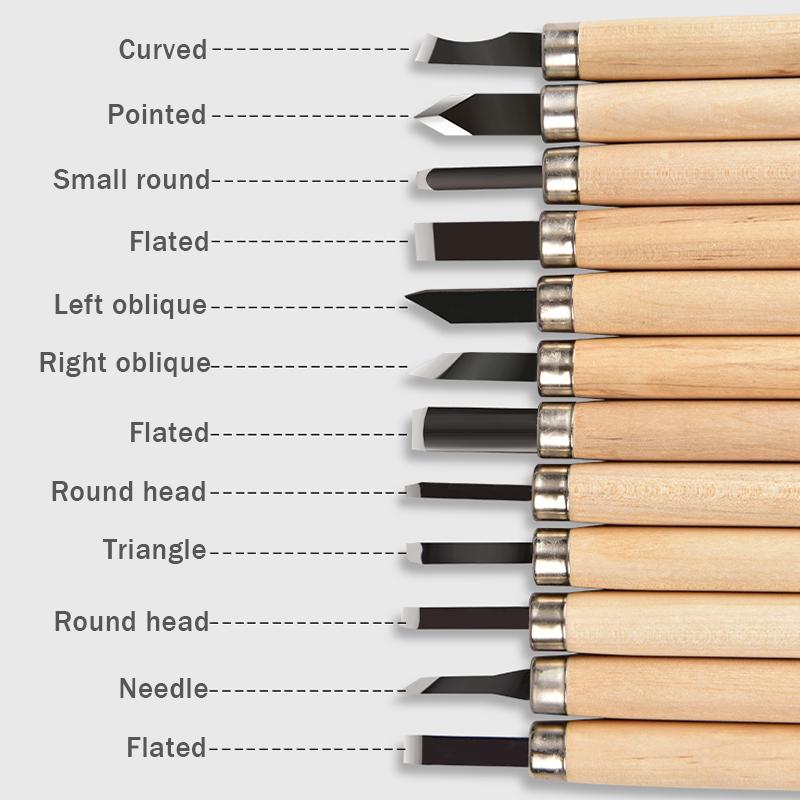
Gouges

Gouges come in a variety of shapes and sizes. The most common types of gouges are the straight and palm gouges. Straight gouges should be held by hand. While palm gouges have shorter shafts or handles, they can be used with your hands. Handheld carving is made easier by the shorter handles. These palm gouges can also be called veiners. They are perfect for carving faces into wood. These are some important things to remember before you begin carving.
First, learn how to choose the best gouge. The gouge you choose should be able to carve a shallow v-shaped groove. Make sure you buy a tool with a sharp edge and a small sweep. Gouges are commonly classified by size. A 3/10 size gouge can make the same cut as a 5-/10 size gouge. As the first number increases, the scoop between the edges becomes deeper and the sweep gets progressively more curved. A small sweep can carve a shallow profile in a gouge.
FAQ
What kind and type of wood should i use?
There are many wood types that are used in woodworking, including oak, maple and birch. Each type of wood has its own unique characteristics that can affect the final product's appearance. Oak, for instance, is darker and harder than most other woods. Birch is soft and lightweight, while mahogany is denser and heavier. You also have the option of solid wood or veneers. Veneers are thin wood sheets that are glued together to form one layer.
How long does a piece take to finish?
It depends on which wood you choose, how complicated your design is and what amount of finishing you apply. Hardwoods require more care than softwoods. Hardwoods tend to be more expensive that softwoods. However, they are stronger and more resistant to moisture. The average time it takes to finish furniture is one week to three weeks.
What is the average time it takes to finish furniture?
It depends on the size of the piece of furniture. Smaller projects like boxes and picture frames can be finished within one day. Larger projects, such as desks and dining tables, can take several days. It takes time to stain and seal the wood properly.
How can I keep my shop organized?
To keep your workshop tidy and organized, you should first create a place for tools storage. Make sure your tools are clean and free of debris and dust so they can be used properly. You can hang tools and accessories with pegboard hooks.
Statistics
- If your lumber isn't as dry as you would like when you purchase it (over 22% in Glen Huey's opinion…probably over 10-15% in my opinion), then it's a good idea to let it acclimate to your workshop for a couple of weeks. (woodandshop.com)
- In 2014, there were just over 237,000 jobs for all woodworkers, with other wood product manufacturing employing 23 percent; wood kitchen cabinets and countertop manufacturing employing 21 percent. (theartcareerproject.com)
- Overall employment of woodworkers is projected to grow 8 percent from 2020 to 2030, about as fast as the average for all occupations. (bls.gov)
- Average lumber prices rose about 600 percent between April 2020 and May 2021. (familyhandyman.com)
External Links
How To
How to join hardwood without using nails
Woodworking is an enjoyable hobby. It's fun and relaxing because you can use your hands to make something useful from wood. You may need to join two pieces without the use of nails. This article will explain how to do this so that your woodwork projects stay beautiful.
Before you can join the wood pieces together, you need to remove any rough edges. Do not leave any sharp corners as they could cause problems down in the future. Now you can start gluing the boards together.
If you are working with hardwood, only one side should be glue. For softwoods like cedar and pine, glue should be applied to both sides. Press the boards down until the glue is fully incorporated. After applying the glue, let dry the boards before proceeding to the next stage.
After you've glued your boards, you'll want to drill holes into the joints where you plan to insert screws. You can choose the type of screw to determine the size of your holes. If you are going to use a half-inch wood screw, you will need to drill at least 3/4 inch deep.
Once you've drilled your holes, you'll want to drive the screws through the joint and into the backside of the board. Do not hit the boards' front surfaces. It will ruin the finish. Try to not hit the ends of the screws when driving the screws. This will prevent splitting the wood's end grain.
After your project is completed, you will need to protect it from the weather. To do this, you can seal the entire furniture piece or just cover the top. It doesn't matter what method you use, you want something that will last many years. You can choose from oil-based varnishes or polyurethane, shellac and lacquer as examples.
These products are available at most home improvement stores. Just make sure that you buy the right kind for the job. Some finishes are toxic and should not ever be used indoors. Protective gear should always be worn when handling these finishes.